Tutorial über Grasshopper-Türstile
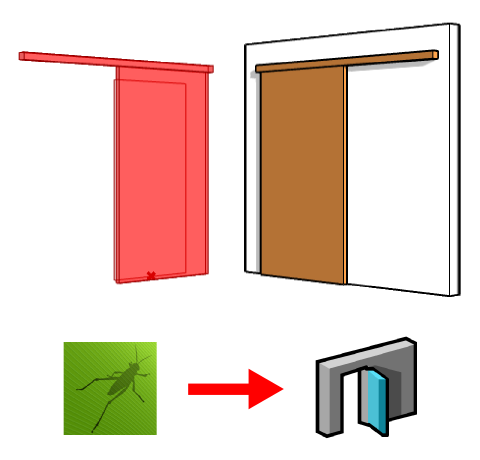
In diesem Tutorial wird ein parametrischer Türstil aus einer Grasshopper-Definition erzeugt. Beide Türen und Fenster folgen den selben Prinzipien, weswegen alles auf diesem Türstil für einen Fensterstil gültig ist.
Die drei wichtigsten zu befolgenden Schritte sind die gleichen wie in jedem anderen Grasshopperstil:
- Konfiguration der Grasshopper-Definition
- Erzeugung des VisualARQ-Treppenstils
- Einsetzen und Bearbeiten einer aus einem Grasshopper-Stil erzeugten Tür
1. Konfiguration der Grasshopper-Definition
In Betracht zu ziehende Voraussetzungen beim Erstellen einer Grasshopper-Definition für einen Grasshopper-Türstil:
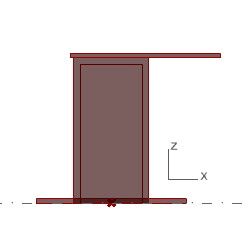
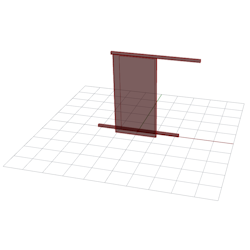
- Die Geometrie in Grasshopper, welche das Tür-Panel repräsentiert, muss mit der XZ-Ebene ausgerichtet werden. (Fig. 1)
- Die Tür benötigt einen Einfügungspunkt, welcher vom Koordinatenursprung (0,0,0) des Dokuments aus gemessen wird. (Fig. 2)
- Die Tür benötigt eine Profilkurve als Ausgabeparameter, um die Form der ungefähren Öffnung auf dem Basisbauteil (Wand, Fassade etc.) zu bestimmen. Wenn keine Profilkurve erstellt wird, wird die Öffnung vom Hüllkörper der Geometrie aus gemessen. In diesem Fall muss sich der untere Mittelpunkt ihres Hüllkörpers auf dem Koordinatenursprung befinden.
Laden Sie hier die in diesem Tutorial verwendete Grasshopperdatei herunter.
Geben Sie Grasshopper in der Befehlszeile von Rhino Grasshopper ein, um ihn zu starten.
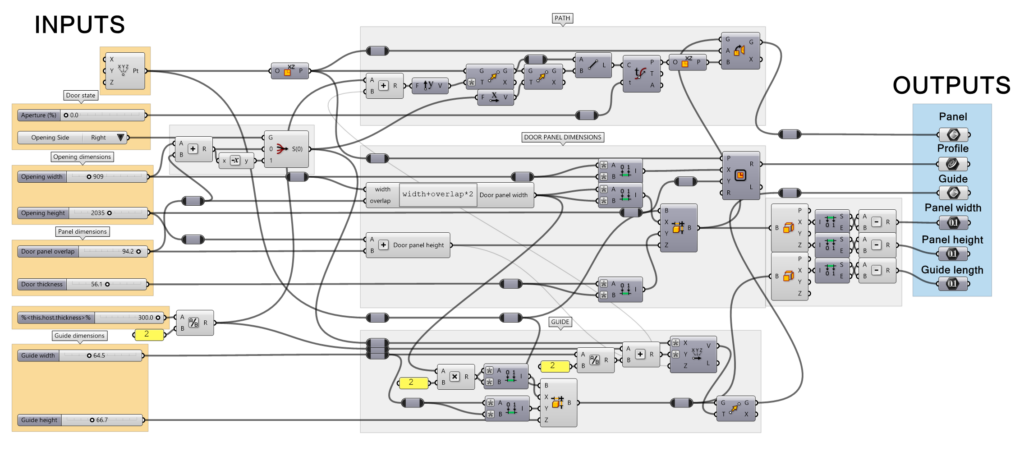
Für die Grasshopper-Definition sind einige Eingabeparameter erforderlich, um die Eigenschaften des neuen Objekts zu definieren, sowie Ausgabeparameter zum Definieren der geometrischen Komponenten des endgültigen Objekts. Einige Ausgabeparameter können verwendet werden, um Information aus dem erstellten Objekt zu erhalten.
- Eingabeparameter: Dies sind die Komponenten, die die Eigenschaften des resultierenden Türstils bestimmen. Dies sind die unterschiedlichen Parameter, die in dieser Definition zu finden sind:
- Numerischer Wert (Gleitkomma): Wird für die verschiedenen Bemaßungen der Tür verwendet. Je nach GH-Definition wird es davon mehr oder weniger geben.
- Numerischer Wert für eine verknüpfte Eigenschaft (Gleitkomma): Wird verwendet, um die Dicke der Basisbauteil-Wand zu erhalten. Indem der Name des Schiebereglers auf
%<this.host.thickness>%gesetzt wird, erhält er den Wert nach Umwandlung in einen VisualARQ-Stil automatisch. Dies ist für in Wände eingelassene Objekte wie Türen und Fenster nützlich. - Numerischer Wert (Gleitkomma): Wird zur Bestimmung der Öffnung des Tür-Panels verwendet. Sie sollte von 0 bis 1 reichen, um später erfolgreich in einen Prozentwert von 0 % bis 100 % umgewandelt zu werden.
- Zahlenwert (integer): ein Schieberegler, der die Anzahl von Objektpaaren definiert.
- Werteliste: Entspricht zwei Ganzzahlen (0 und 1) und wird zur Bestimmung der Öffnungsseite der Tür verwendet.
- Ausgabeparameter: Diese sind die Komponenten, die von VisualARQ gelesen werden, sobald wir den Stil erstellt haben. VisualARQ erkennt nur diejenigen Ausgabeparameter, die Endkomponenten mit nicht verbundenen Ausgabeknoten sind. In diesem Beispiel finden wir die folgenden Ausgabeparameter:
- Geometrische Ausgaben: hierbei handelt es sich um diejenigen, die als die verschiedenen Teile eines Objektstils gelesen werden. In diesem Beispiel gibt es drei Geometrie-Params:
- Zwei Brep-Params, einer für das Panel und ein weiterer für die Führung.
- Ein Kurven-Param welcher der Öffnungs-Profilkurve entspricht. Dieser bestimmt die Form der Öffnung, welche die Tür auf der Wand ausführen wird. Der mittlere untere Punkt dieser Öffnungs-Profilkurve muss sich auf den Koordinaten (0,0,0) befinden. Diese Ausgabekurve ist nur notwendig, wenn der Hüllkörper der Ausgabe-Breps nicht der Öffnung in der Wand entspricht, wie in diesem Fall.
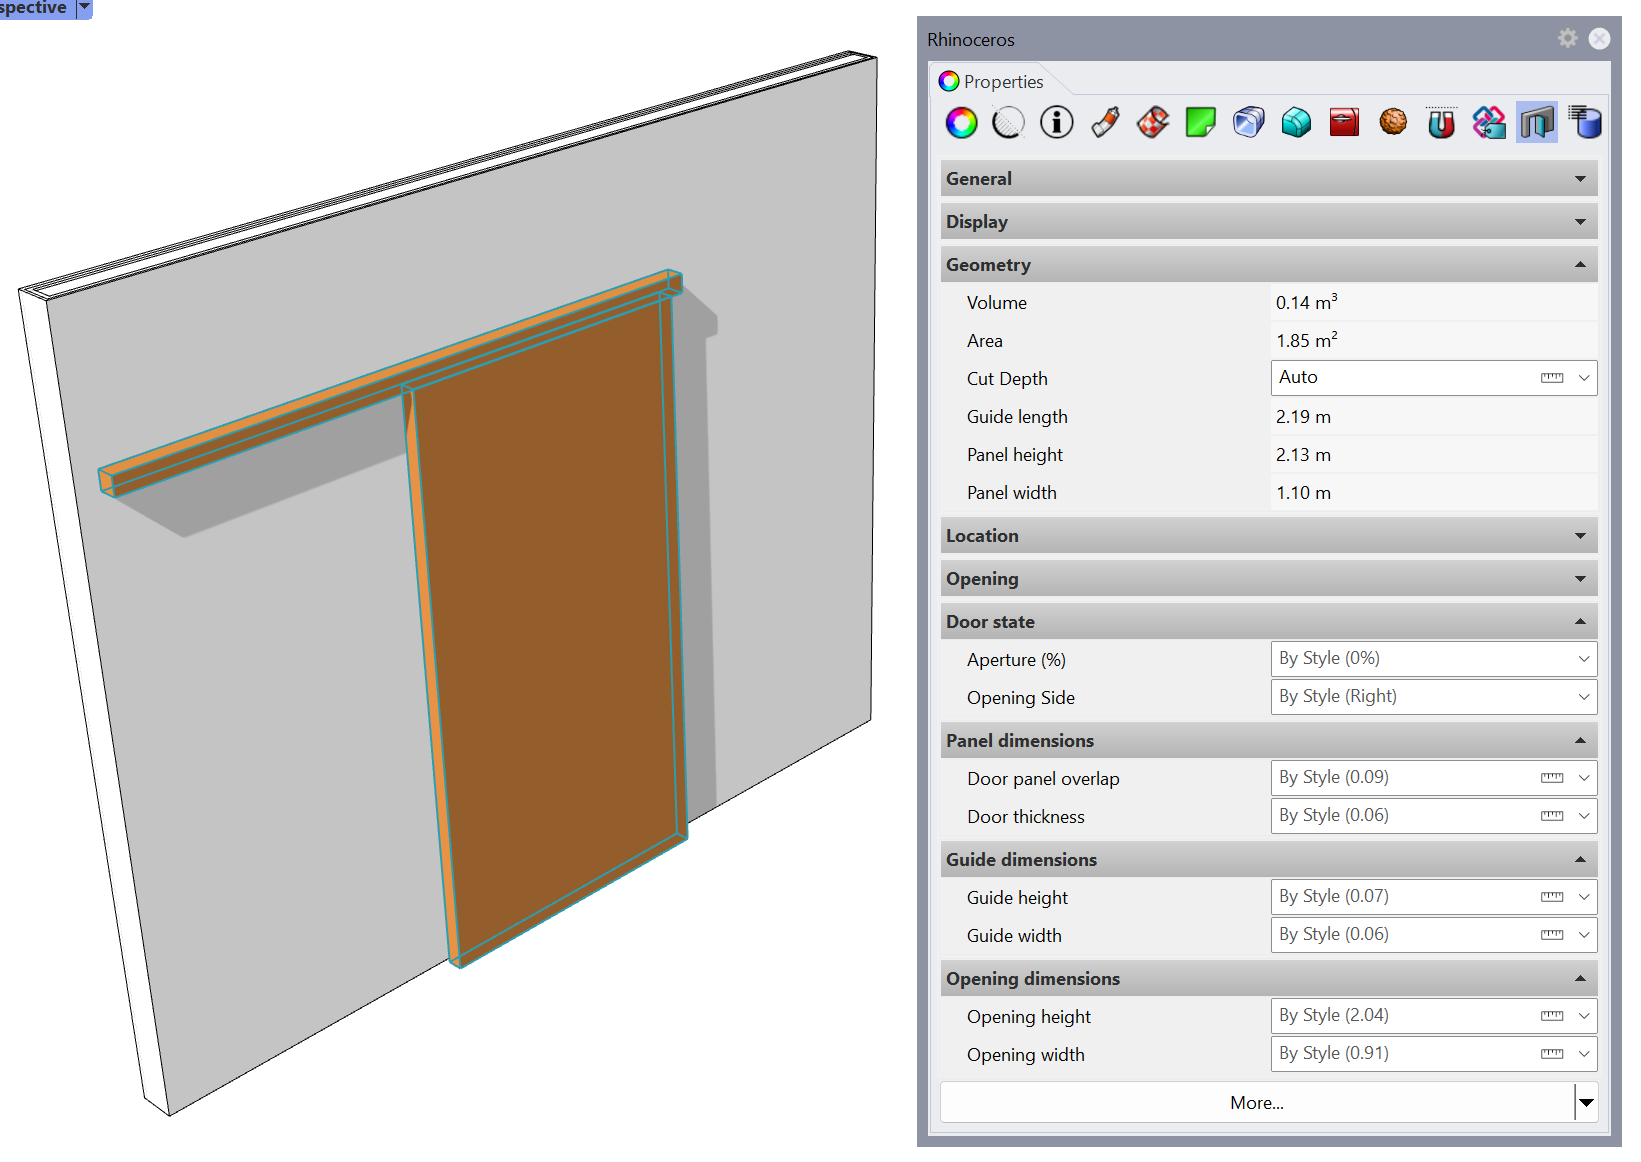
- Ausgabeparameter: diese werden für den Erhalt von Information aus dem erstellten Objekt verwendet. In diesem Beispiel informieren uns drei Zahlen-Params über die Führungslänge und die Panelbreite und -höhe:
- Geometrische Ausgaben: hierbei handelt es sich um diejenigen, die als die verschiedenen Teile eines Objektstils gelesen werden. In diesem Beispiel gibt es drei Geometrie-Params:
Es ist wichtig, diese Komponenten in Grasshopper zu benennen, um sie beim Erstellen eines neuen Stils leicht zu identifizieren:
2. Erzeugung des VisualARQ-Türstils
In diesem Fall wird der Grasshopperstil über den Stützenstil-Dialog erzeugt und verwaltet.
2.1 Erzeugen des neuen Stils
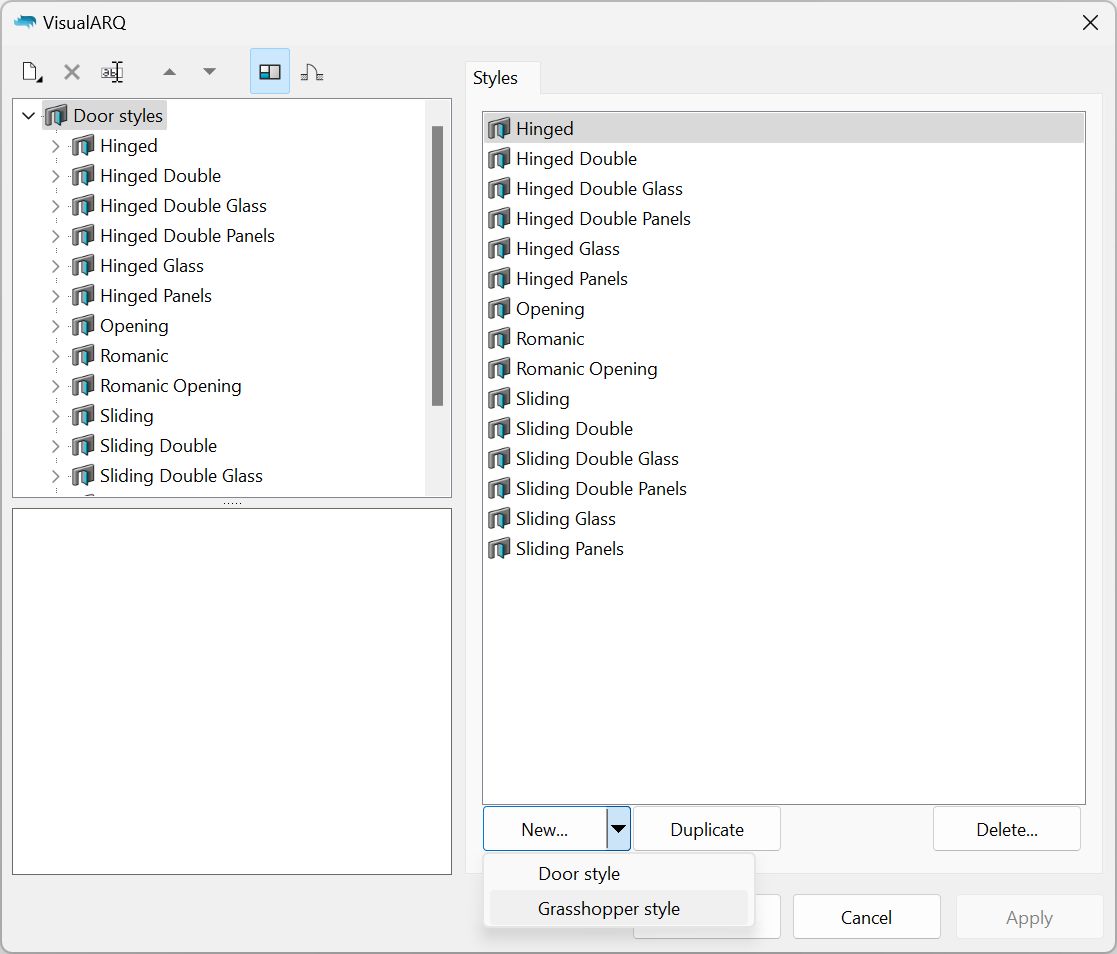
- Ist die Grasshopperdefinition (.gh-Datei) bereits erstellt, öffnen Sie den Stützenstil-Dialog:
vaStützenStileaus. - Klicken Sie auf die Schaltfläche Neu… und wählen Sie die Option Grasshopper-Treppenstil.
Der Grasshopper-Stilassistent wird geöffnet. Dieser Assistent führt Sie durch die notwendigen Schritte, um die Parameter der Grasshopper-Balkenstile festzulegen. Links auf dem Assistenten wird eine Vorschau des Objektstils zu sehen sein, sobald die dafür erforderliche Information vollständig ist.
2.2 Öffnen Sie die Grasshopper-Definition
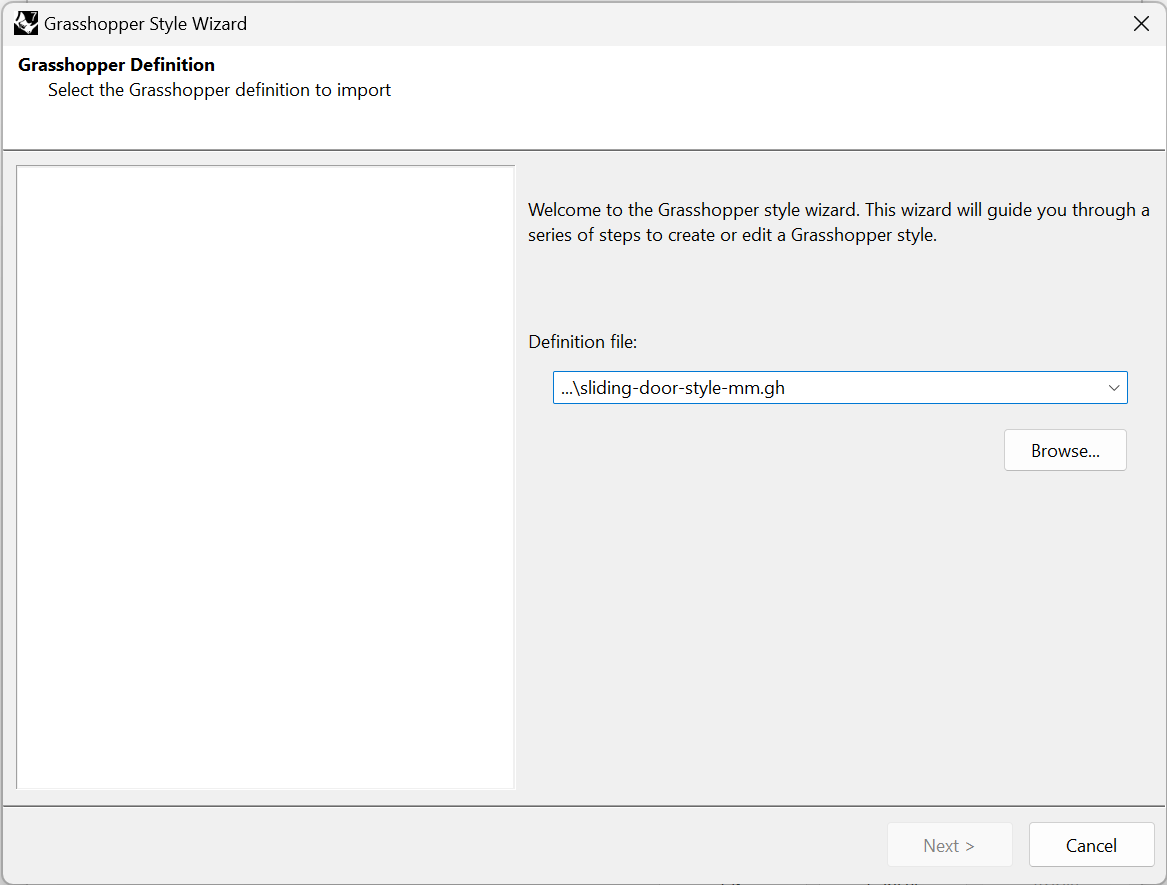
Klicken Sie auf die Schaltfläche Durchsuchen um die .gh-Datei auszuwählen oder wählen Sie eine der zuletzt verwendeten Dateien aus der Dropdownliste aus.
2.3 Konfiguration
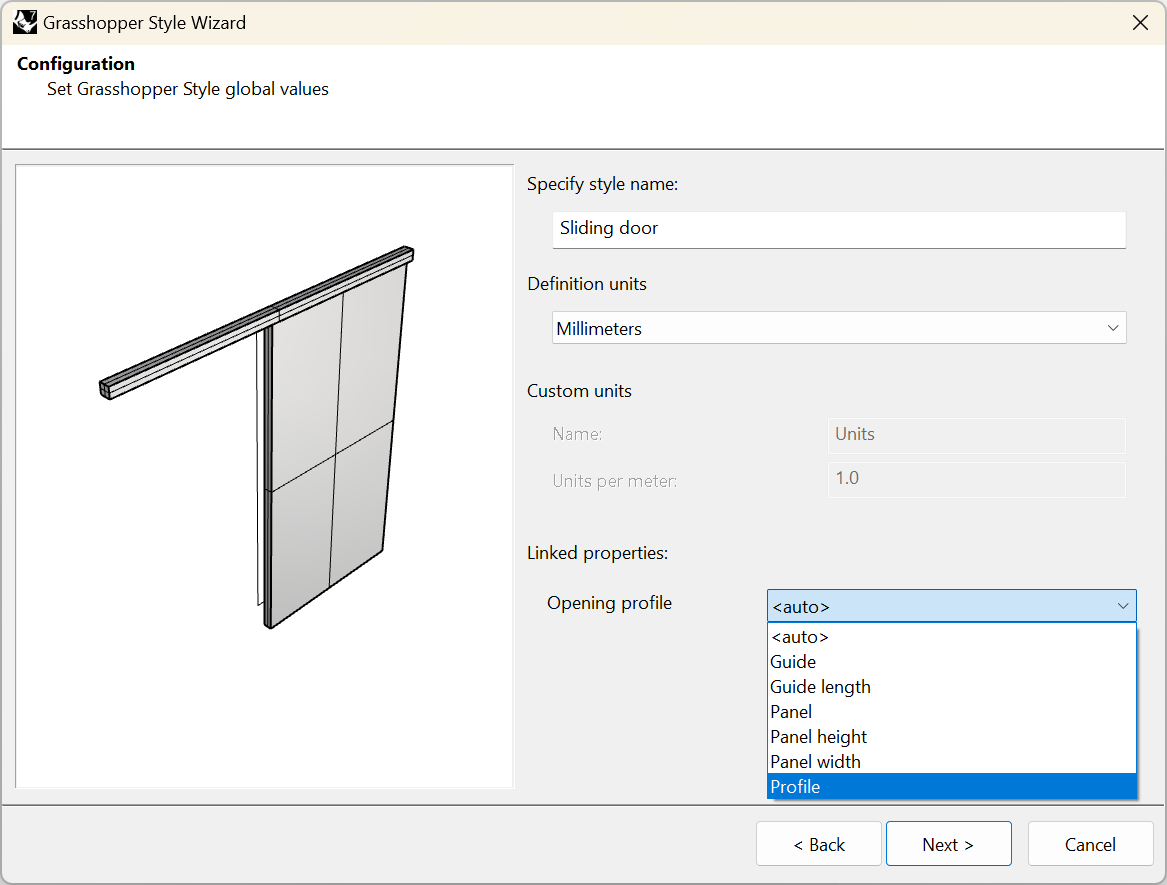
Stellen Sie die allgemeinen Werte des Grasshopper-Türstils ein:
- Stilname: setzen Sie den gewünschten Namen.
- Definitionseinheiten: in diesem Fall wurden Millimeter verwendet.
- Öffnungsprofil (verknüpfte Eigenschaften): eine Eingabenkurve-Parameterkomponente zur Darstellung der geschlossenen Kurve, die zur Erzeugung der Öffnung in der Wand verwendet wird. Wenn keine Kurve ausgewählt ist, wir der Hüllkörper der Tür zur Erzeugung der Öffnung verwendet. In diesem Fall ist es notwendig, eine Kurve auszuwählen, da der Hüllkörper der Ausgabe-Breps nicht mit der Öffnung in der Wand übereinstimmt.
2.4 Geometrie
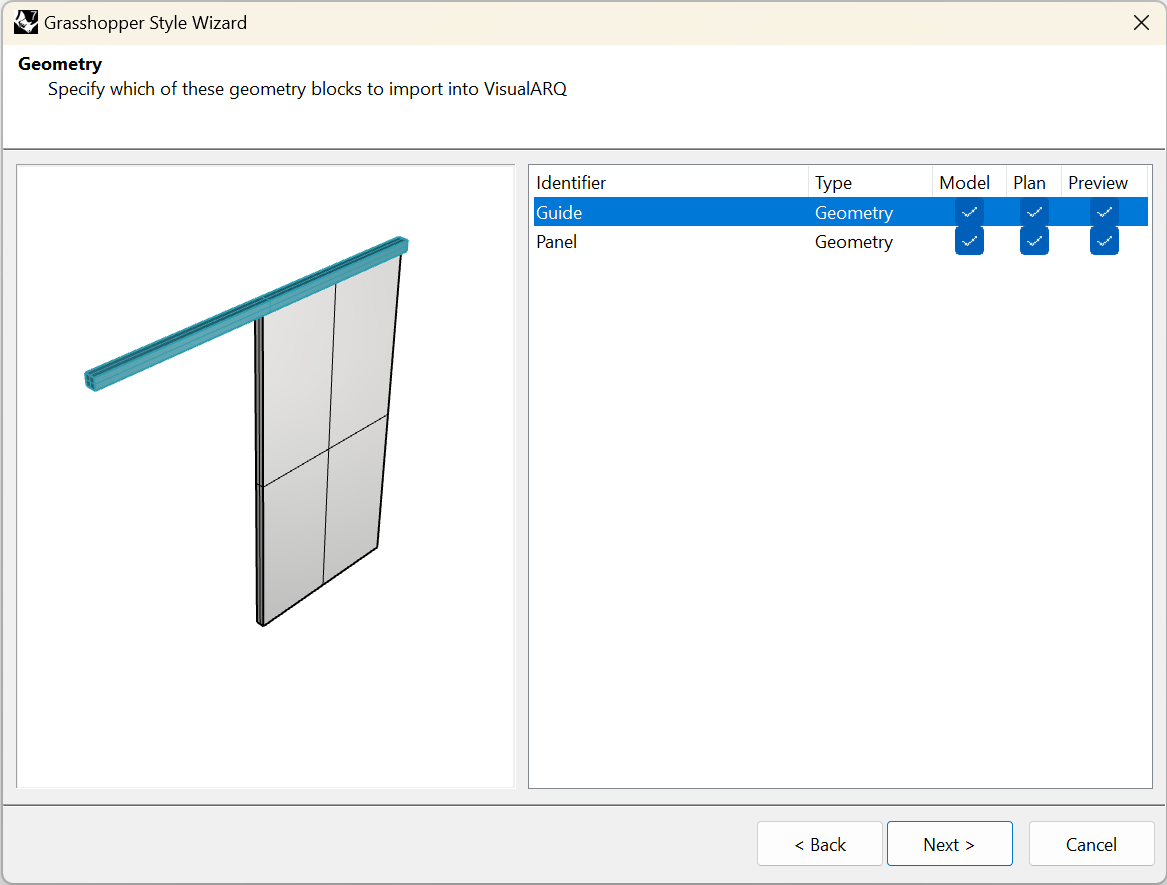
Geben Sie an, welche der Ausgabe-Geometriekomponenten (Params) in VisualARQ importiert werden sollen. Die Erkennungen diesesr Geometriekomponenten werden von den Namen der geometrischen Ausgabekomponenten in der Grasshopperdefinition genommen und können nur nach vorheriger Erzeugung des Stils geändert werden.
Sie können die Darstellung auswählen, wo jede Komponente verwendet wird:
- Modell: der Objektrepräsentation in 3D.
- Plan: die Objektrepräsentation in der Planansicht. Nur dann in Draufsichten sichtbar, wenn die Schnittebene der Ebene, auf der das Objekt platziert ist, aktiviert ist und sich mit dem Objekt schneidet.
- Vorschau *: die Objektdarstellung, während das Objekt eingefügt (oder danach verschoben) wird. Auf diese Weise können Sie vor Beendigung des Befehls eine Vorschau des endgültigen Objekts erhalten.
*Hinweis: Es wird dringend empfohlen, die Vorschau-Darstellung nur für die notwendige Geometrie zu verwenden, die beim Einsetzen des Objekts im Modell angezeigt werden soll. Je weniger Komponenten für die Vorschau aktiviert werden, desto schneller geht das Einfügen oder Bearbeiten dieser Objekte im Modell vonstatten, besonders wenn sie mit komplexen Grasshopper-Definitionen erstellt sind. Achten Sie darauf, dass wenigstens eine Komponente für diese Darstellung aktiviert ist.
In diesem Fall gibt es zwei geometrische Ausgaben, die wir in den drei verschiedenen Darstellungen zeigen wollen: Modell, Plan und Vorschau. Das bedeutet, dass die Plandarstellung dem horizontalen Abschnitt des 3D-Objekts entsprechend der Schnittebenen-Höhe des Levels entnommen wird.
2.5 Parameters
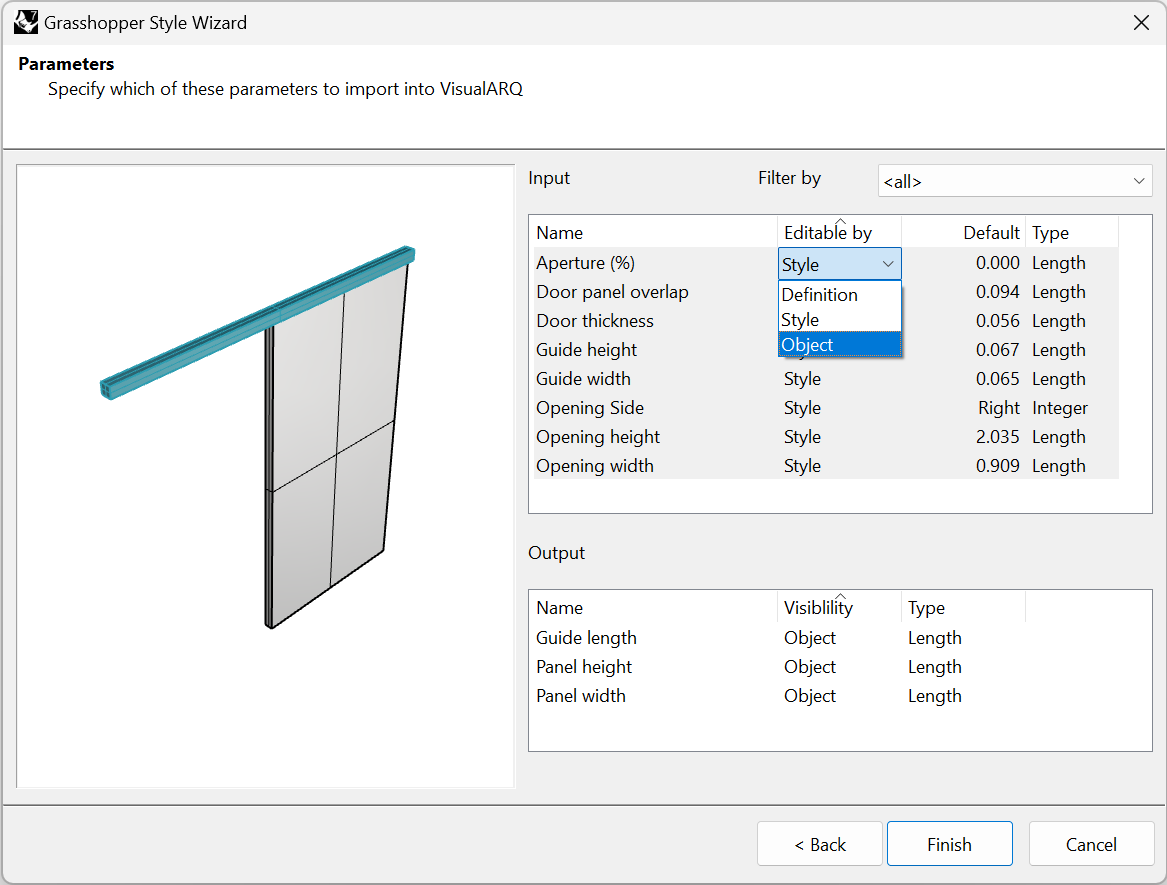
Dieser Schritt zeigt die Einstellungen, die für die Liste von in Grasshopper definierten Eingabe- und Ausgabeparameter verfügbar sind. Dank des Optionenfilters können Sie die innerhalb der benannten Gruppen in der Grasshopper-Definition zu findenden Parameter sehen. Es gibt zwei Arten von Parametern:
- Eingabeparameter: diese Parameter definieren den Türstil.
- Ausgabeparameter: diese Parameter erhalten Information aus dem erstellten Objekt.
Die Einstellungen sind jeweils verschieden:
- Eingabeparameter:
- Name: dies ist die Bezeichnung des Parameters und kann geändert werden, falls dies In diesem Schritt gewünscht wird.
- Bearbeitbar nach (Sie können diesen Wert für mehrere Parameter ändern, indem Sie sie bei gleichzeitigem Gedrückthalten der Strg-Taste ändern):
- Definition: die Parameter werden ausgeblendet, und der Wert aus der Grasshopperdefinition wird beibehalten.
- Style: der Parameter kann nur nach Stil bearbeitet werden und die Änderungen werden mit diesem Stil auf alle Objekte im Modell angewendet.
- Object: ermöglicht es, in dem Modell das den selben Stil hat, für jede Spalte einen unterschiedlichen Wert für diesen Parameter zu setzen. Falls kein Wert „Nach Objekt“ zur Verfügung steht, wird der nach Stil definierte Wert verwendet.
- Standard (Wert): zeigt für die Eingabeparameter den Standardwert an (die in der Grasshopperdefinition angegebenen) und ermöglicht Ihnen die Einstellung verschiedener Standardwerte.
- Typ: zeigt die unterschiedlichen, für jede Art von Parameter verfügbaren Werte an. In diesem Fall handelt es sich bei den meisten davon um Gleitkomma-Werte, die automatisch auf Länge gesetzt wurden. Es gibt auch eine Werteliste für die Öffnungsseite, welche auf Ganzzahl gesetzt wurde, da sie 0 oder 1 sein muss. Die einzige, die geändert werden muss, ist die Öffnungs-Eingabe, welche auf Prozent eingestellt sein sollte, um den entsprechenden Wert zwischen 0 % und 100 % zu erhalten. In der Grasshopper-Definition sollte ein Gleitkommazahl-Eingabeparameter zwischen 0 und 1 definiert sein, um diese Konvertierung erfolgreich zu erhalten.
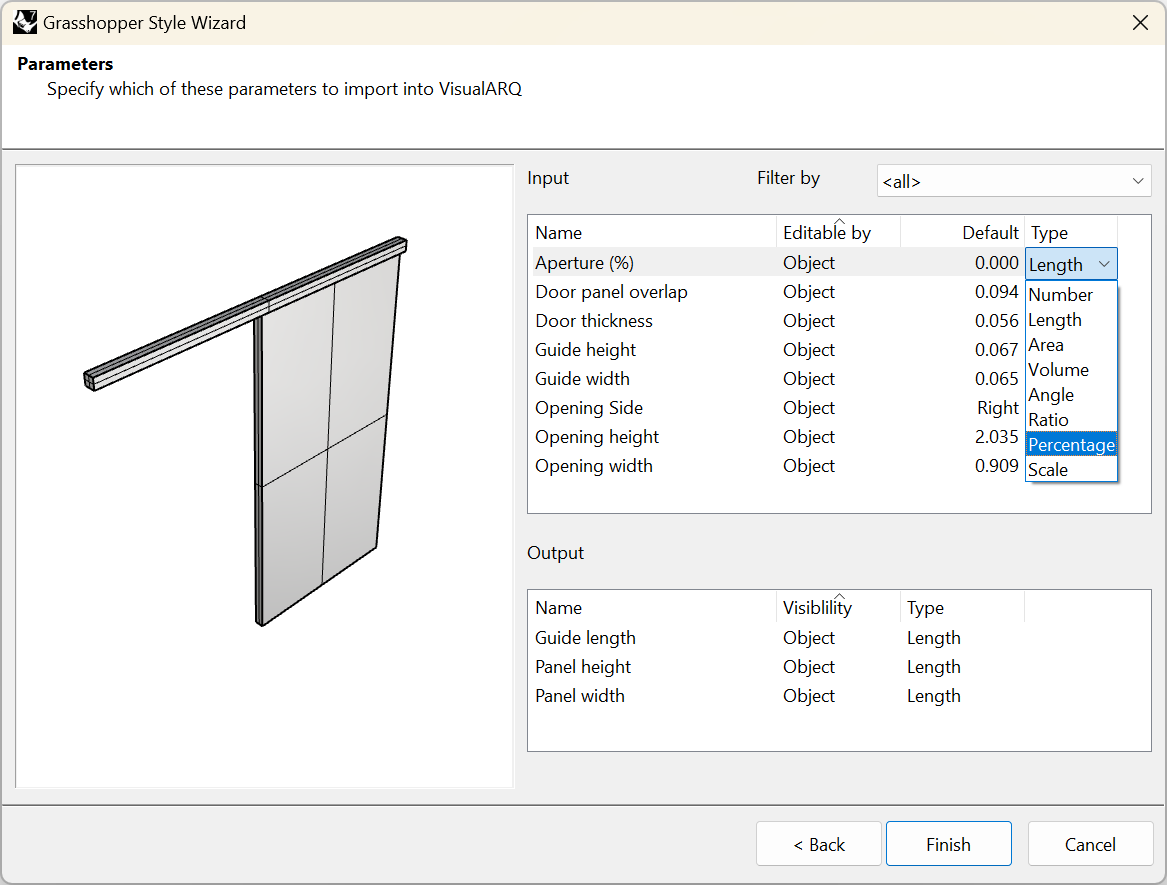
- Ausgabeparameter:
- Name: dies ist die Bezeichnung des Parameters und kann geändert werden, falls dies In diesem Schritt gewünscht wird.
- Sichtbarkeit: wählen Sie die Option „Objekt“ zur Anzeige dieses Parameters in den VisualARQ-Dialogen oder „Nichts“ um ihn auszublenden.
- Typ: zeigt die Art von Wert, die zuvor in Grasshopper für diesen Parameter definiert wurde.
3. Einsetzen und Bearbeiten der aus einem Grasshopper-Stil erzeugten Tür
3.1 Bearbeitung des Türstils

Sobald der Grasshopper-Stilassistent abgeschlossen ist, wird der neue Stil in der Liste von Türstilen erscheinen. Um den Stil erneut zu bearbeiten, klicken Sie zum Öffnen des Kontextmenüs mit der rechten Maustaste auf den Stilnamen und wählen Sie Bearbeiten aus. Durch diese Operation wird der Grasshopper-Stilassistent erneut geöffnet.
Die Eingabe-Parameter werden unter dem Reiter „Parameter“ verfügbar sein und wie in der Grasshopperdefinition gruppiert erscheinen. Falls der Name der Gruppe mit einer vorhandenen Kategorie übereinstimmen sollte, werden sie in der selben Kategorie erscheinen.
3.2 Einsetzen des Grasshopper-Stils
Sobald der Stil erstellt ist, werden Sie eine Instanz im Dokument einfügen können, und es wird eine Öffnung in der Basisbauteil-Wand wie eine sonstige Tür erzeugen. Sie werden die Werte ihrer Parameter im VisualARQ-Türsymbol unterhalb des Eigenschaftenpanels ändern können, so wie es mit jeglichem anderen VisualARQ-Objekt funktioniert. Nur jene Eingabeparameter, die im Schritt 2.5 als bearbeitbar „Nach Objekt“ eingestellt wurden, werden sichtbar sein. Die Ausgabeparameter werden Sie auch in diesem Teil des Eigenschaftenpanels sehen.