Tutoriel sur les styles d’annotations de Grasshopper
Au cours de ce tutoriel nous allons créer un style d’annotation paramétrique à partir d’une définition de Grasshopper.
Les 3 étapes principales à suivre sont les mêmes que pour n’importe quel style de Grasshopper :
- Création de la définition de Grasshopper
- Création du style d’annotation de VisualARQ
- Insertion et modification du style d’annotation de Grasshopper
1. Créer la définition de Grasshopper
Conditions préalables à prendre en compte lors de la création d’une définition de Grasshopper pour un style d’annotation de Grasshopper :
- Dans VisualARQ, les annotations sont créées à partir d’un point d’insertion et d’un plan. Ce point d’insertion dans la définition de Grasshopper est mesuré à partir de l’origine des coordonnées (0,0,0) du document et par défaut correspond au plan XY.
- Si dans les paramètres d’entrée le point d’insertion est défini en tant que plan, l’objet final pourra être placé sur n’importe quel plan de l’espace de modélisation. Sinon, il sera toujours placé sur le plan XY.
Téléchargez le fichier de Grasshopper utilisé dans ce tutoriel ici.
Tapez Grasshopper dans la ligne de commandes de Rhino pour lancer Grasshopper.
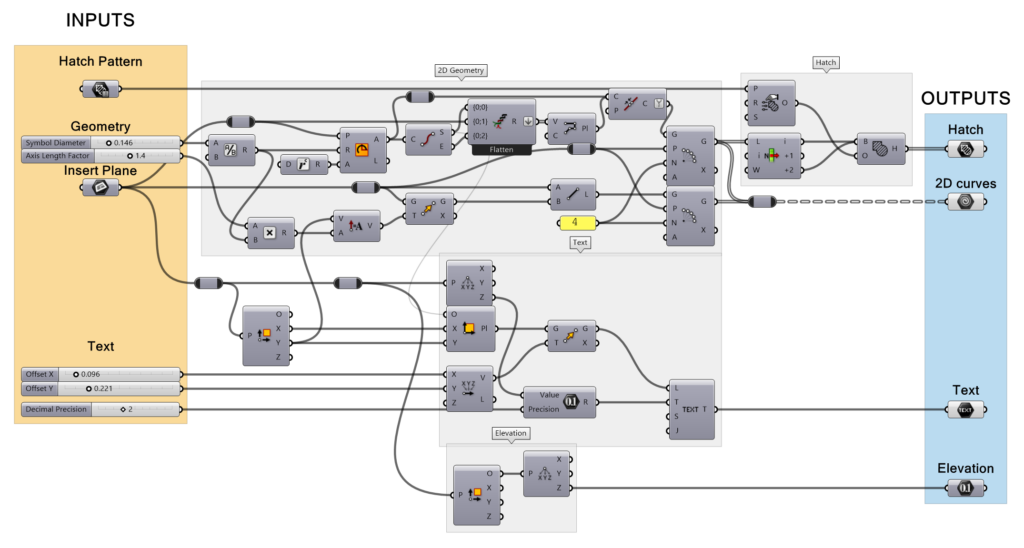
Une définition de Grasshopper doit comporter des paramètres d’entrée pour définir les caractéristiques du nouvel objet et des paramètres de sortie pour définir les composants géométriques de l’objet final. Certains paramètres de sortie peuvent servir à retrouver des informations à partir de l’objet créé.
- Paramètres d’entrée : ils définissent les caractéristiques du style final. Ce sont les différents paramètres que l’on retrouve dans cette définition :
- Plan : indique le point (et le plan) de référence de l’annotation.
- Motif de hachures : indique le motif de hachures de l’annotation.
- Glisseur numérique (virgule flottante) : au total, 4 glisseurs sont utilisés pour les différentes dimensions de l’annotation.
- Glisseur numérique (nombre entier) : indique le nombre de décimales.
- Paramètres de sortie : ce sont les composants qui seront lus par VisualARQ une fois que nous aurons créé le style. VisualARQ ne reconnaît que les paramètres de sortie qui sont des composants de fin avec leurs nœuds de sortie non connectés. Dans cet exemple, les paramètres de sortie sont les suivants :
- Sorties géométriques : ce sont les composants qui seront lus comme les différentes parties de l’annotation.
- Text Param (paramètre de texte)
- Geometry Param (paramètre de géométrie)
- Hatch Param (paramètre de hachures)
- Output parameters: these are used to retrieve information from the object created. In this example we can find the following output parameter:
- Number Param : il est utilisé pour récupérer l’élévation de l’annotation finale.
- Sorties géométriques : ce sont les composants qui seront lus comme les différentes parties de l’annotation.
Il est important de nommer ces composants dans Grasshopper pour les identifier facilement lors de la création du nouveau style :
2. Créer le style d’annotation de VisualARQ
Nous allons créer et gérer le style de Grasshopper à partir de la boîte de dialogue de styles d’annotations.
2.1 Créer le nouveau style
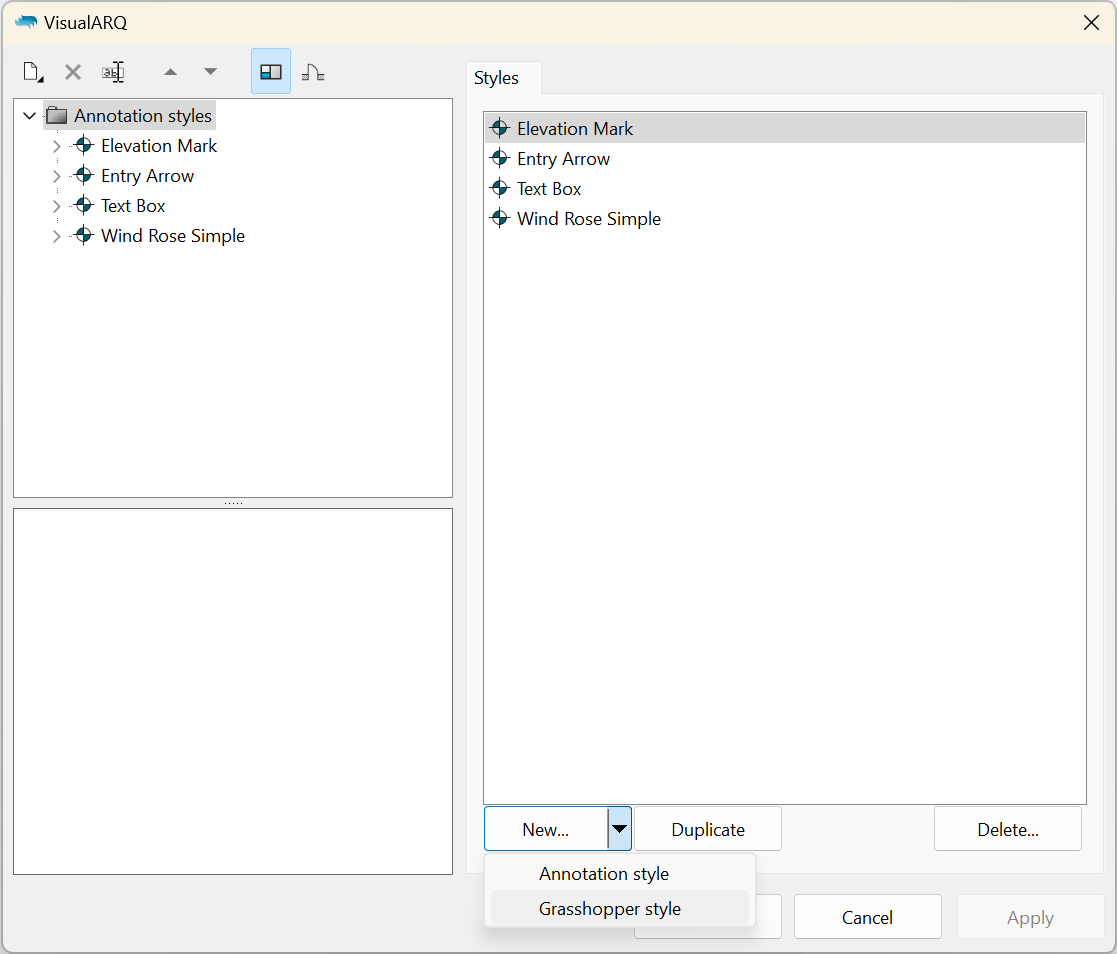
- Une fois la définition de Grasshopper (fichier .gh) réalisée, ouvrez la boîte de dialogue des styles de poteaux:
_vaStylesAnnotation. - Cliquez sur le bouton Ajouter et sélectionnez l’option Style de Grasshopper.
L’assistant de style de Grasshopper apparaîtra. Cet assistant vous guidera à travers les étapes pour définir les paramètres de style de Grasshopper. Le côté gauche de l’assistant affichera un aperçu du style d’objet généré dès que les informations nécessaires sont renseignées.
2.2 Ouvrir la définition de Grasshopper
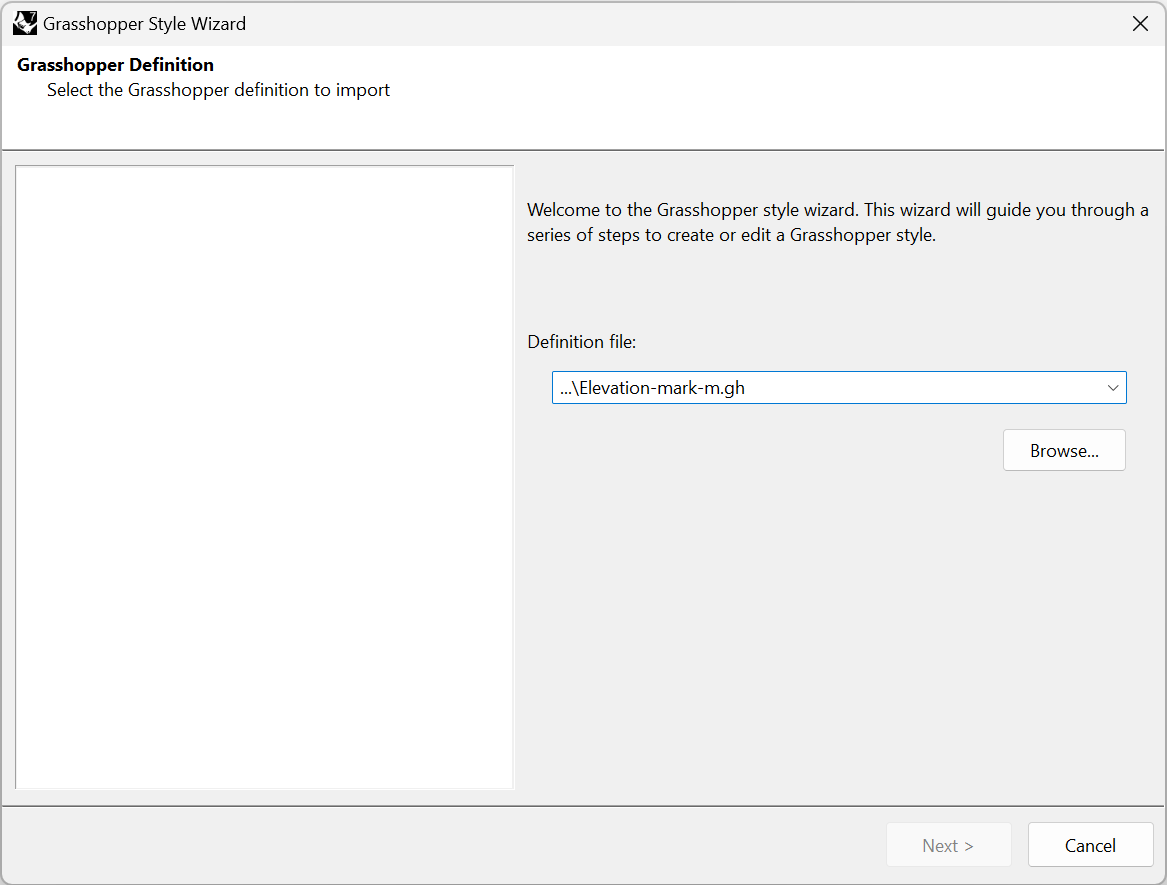
Cliquer sur le bouton Parcourir pour sélectionner le fichier .gh ou choisir un des derniers fichiers dans la liste déroulante.
2.3 Configuration
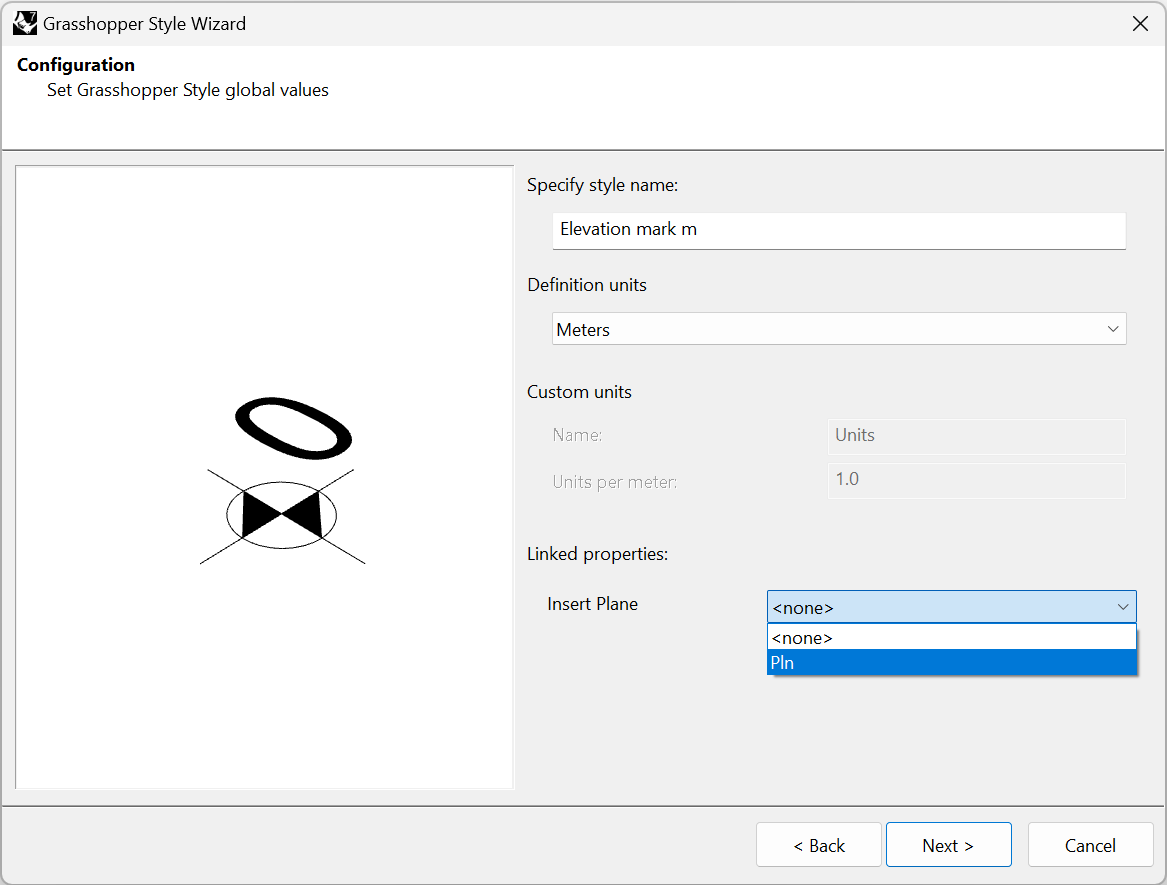
Définissez les valeurs générales du style de Grasshopper :
- Nom du style : indiquez le nom de votre choix.
- Unités de la définition : dans ce cas, elle a été créée en mètres.
- Insert Plane (Linked properties): the base point to place the annotation. Any input Plane or Point parameter created in the GH definition will be available here.
- Si vous ne sélectionnez pas de point ou de plan (option « Aucun« ), c’est l’origine de la définition de GH qui sera utilisée. Cependant, la valeur d’élévation ne sera pas liée à la position de l’annotation.
- Si le fichier de GH contient un point (au lieu d’un plan) et que vous le choisissez ici, l’annotation prend l’élévation du plan du point comme référence, mais son orientation sera contrainte au plan de ce point dans la définition Grasshopper.
- Si l’entrée « Plan » est sélectionnée, l’annotation sera placée dans l’orientation du plan de construction actuel de la fenêtre dans laquelle l’objet est inséré. C’est l’option recommandée dans cet exemple.
2.4 Géométrie
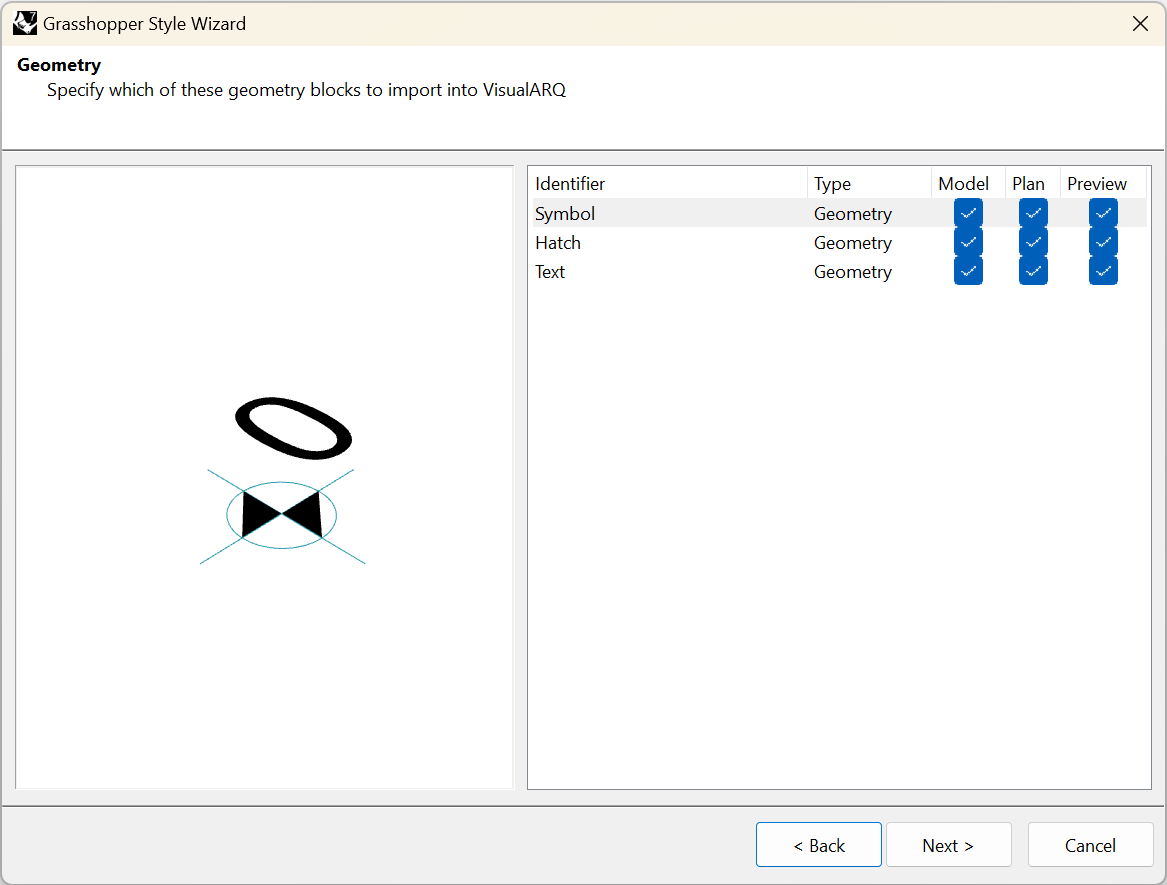
Indiquez les composants de géométrie de sortie (Params) à importer dans VisualARQ. Les identificateurs de ces composants de géométrie sont déterminés à partir du nom des composants de sortie de géométrie dans la définition de Grasshopper et ils ne peuvent être modifiés que lorsque le style a été créé.
Vous pouvez choisir la représentation dans laquelle chaque composant sera utilisé :
- Modèle : représentation de l’objet en 3D.
- Plan : représentation de l’objet dans la vue en plan. Elle n’est visible que dans les vues de dessus lorsque le plan de coupe du niveau où l’objet est placé est activé et qu’il coupe l’objet.
- Aperçu * : représentation de l’objet lorsque cet objet est inséré (ou ensuite déplacé). Cela permet d’avoir un aperçu de l’objet final avant de terminer la commande.
*Remarque : Il est fortement recommandé de n’utiliser une représentation d’Aperçu que pour la géométrie nécessaire à afficher lors de l’insertion de l’objet dans le modèle. En effet, moins il y a de composants ayant la case Aperçu cochée, plus l’insertion ou la modification de ces objets dans le modèle sera rapide, en particulier lorsqu’ils sont créés à partir de définitions de Grasshopper complexes. N’oubliez pas toutefois de laisser au moins un composant avec cette représentation.
Dans ce cas, nous voulons montrer trois sorties de géométrie dans les trois représentations différentes : modèle, plan et aperçu. Cela signifie que la représentation en plan sera prise à partir de la section horizontale de l’objet 3D en fonction de la hauteur du plan de coupe du niveau.
2.5 Paramètres

Cette étape présente les options disponibles pour la liste des paramètres d’entrée et de sortie définis dans Grasshopper. L’option « Filtrer par option » vous permet de visualiser les paramètres situés à l’intérieur des groupes nommés dans la définition de Grasshopper. Deux types de paramètres sont disponibles :
- Paramètres d’entrée : ces paramètres définissent le style d’annotation.
- Paramètres de sortie : ces paramètres permettent de retrouver des informations à partir de l’objet créé.
Les options sont différentes pour chacun d’entre eux :
- Paramètres d’entrée :
- Nom : il s’agit de l’identifiant du paramètre. Il peut être modifié si nécessaire au cours de cette étape.
- Modifiable par (Vous pouvez modifier cette valeur simultanément pour plusieurs paramètres en les sélectionnant tout en maintenant la touche Ctrl enfoncée.) :
- Définition : le paramètre sera caché et il conservera la valeur de la définition de Grasshopper.
- Style : le paramètre ne peut être modifié que par style ; ainsi les modifications seront appliquées à tous les objets du modèle définis avec ce style.
- Objet : permet de définir une valeur différente pour ce paramètre pour chaque poteau du modèle ayant le même style. Si aucune valeur n’est donnée « par objet », c’est la valeur définie par style qui sera utilisée.
- Défaut (valeur) : affiche la valeur par défaut (des paramètres qui ont été spécifiés dans la définition de Grasshopper) pour les paramètres d’entrée et vous permet de définir des valeurs par défaut différentes.
- Type : montre les différents types de valeurs disponibles pour chaque type de paramètre. Dans ce cas, ils ont tous été réglés automatiquement sur le type correspondant. Ce sont presque toutes des valeurs à virgule flottante de type Length, mais il y en a aussi une de type Integer et une de type Text.
- Paramètres de sortie :
- Nom : il s’agit de l’identifiant du paramètre. Il peut être modifié si nécessaire au cours de cette étape.
- Visibilité : choisissez l’option « Objet » pour afficher ce paramètre dans les boîtes de dialogues de VisualARQ ou « Aucun » pour le cacher.
- Type : indique le type de valeur qui a été défini dans Grasshopper pour ce paramètre.
3. Insérer et modifier le style d’annotation de Grasshopper
3.1 Modifier le style d’annotation
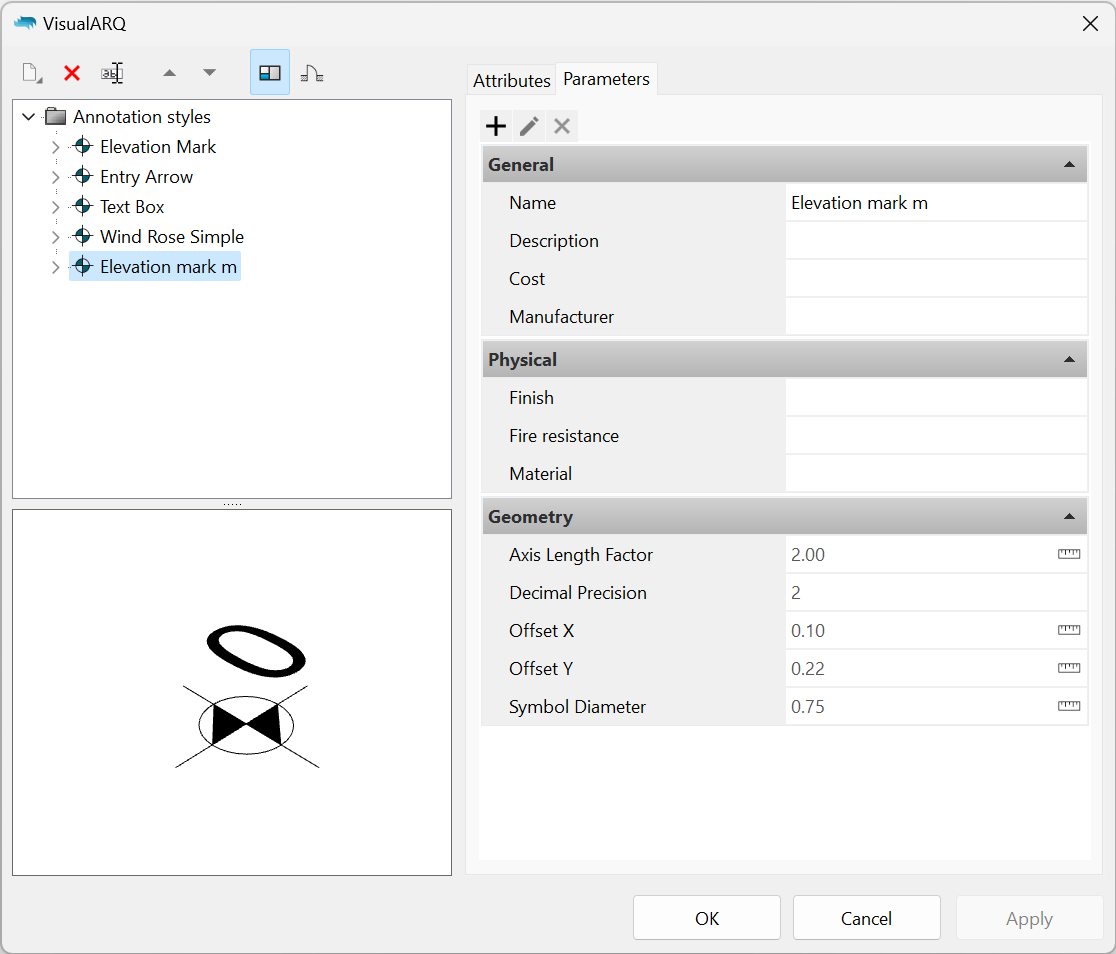
Lorsque l’assistant de style de Grasshopper est terminé, le nouveau style apparaît dans la liste des styles d’annotations avec ses propres sous-composants (symbole, texte et hachures). Pour modifier à nouveau le style, cliquez avec le bouton de droite sur le nom du style afin d’ouvrir le menu contextuel et choisissez Modifier. Cette opération rouvrira l’assistant de style de Grasshopper.
Les paramètres d’entrée seront disponibles sous l’onglet « Paramètres » et seront regroupés comme dans la définition de Grasshopper. Si le nom du groupe correspond à une catégorie existante, ils apparaîtront dans cette catégorie.
3.2 Insérer le style de Grasshopper
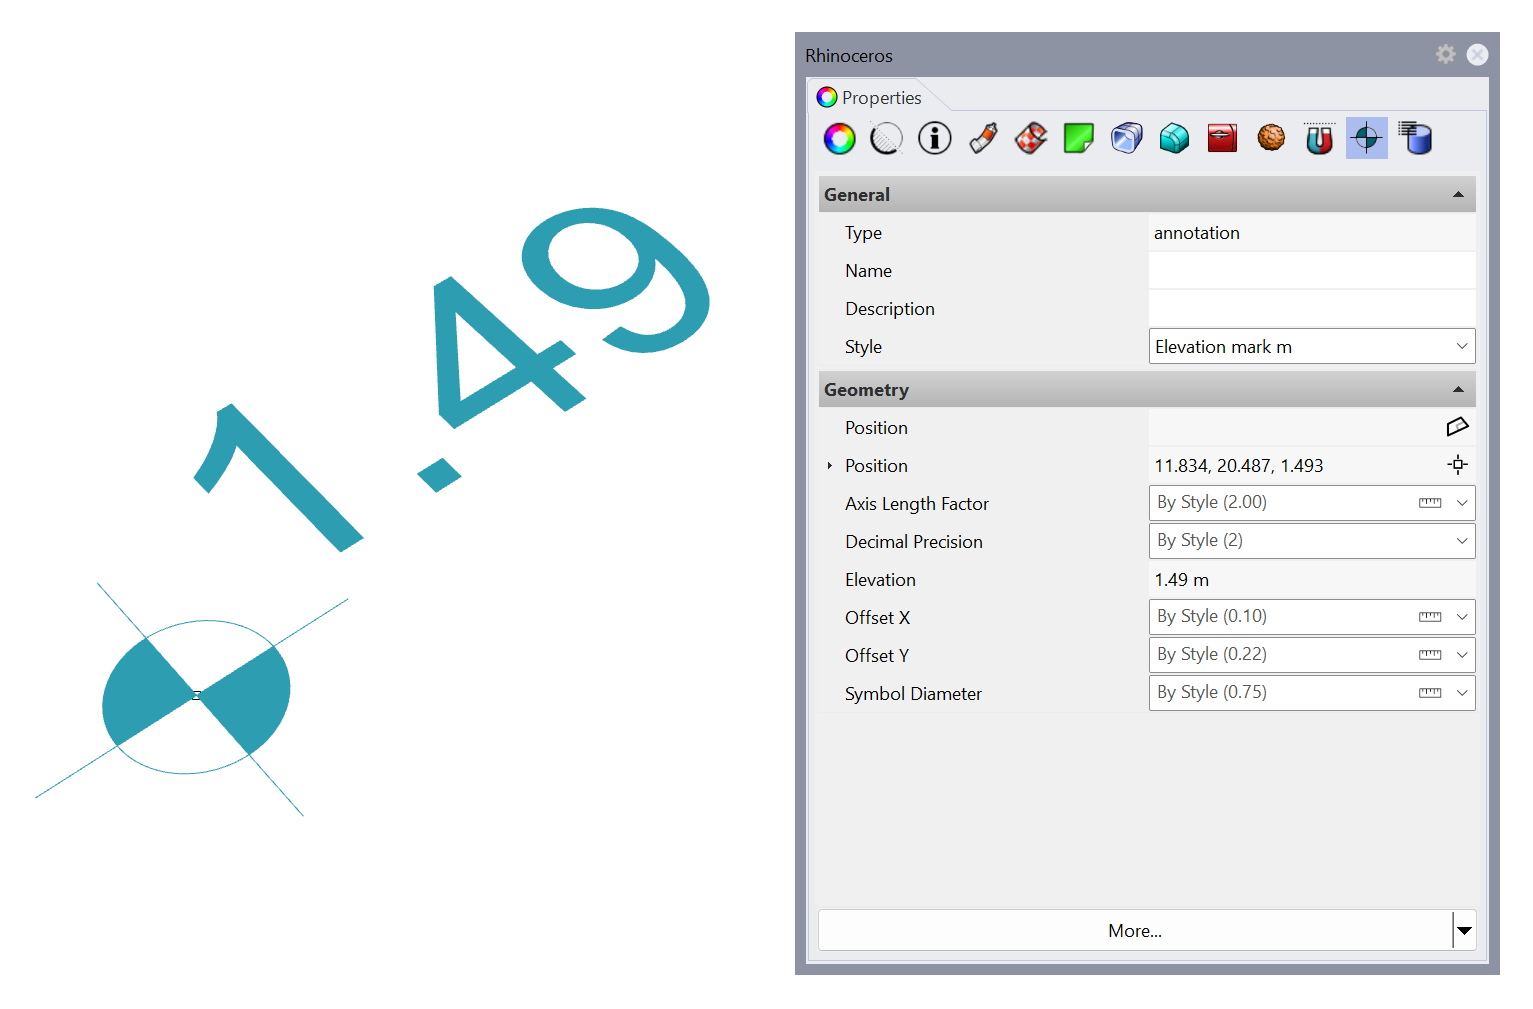
Une fois le style d’annotation créé, vous pourrez insérer une annotation dans le document et modifier les valeurs de ses paramètres à partir de l’icône de l’annotation de VisualARQ située sous le panneau des propriétés, comme pour n’importe quel objet de VisualARQ. Seuls les paramètres d’entrée qui ont été définis comme modifiables « Par objet » à l’étape 2.5 seront visibles. Vous verrez aussi les paramètres de sortie dans cette partie du panneau des propriétés.