Exercise 4. Create a Stair
1. Create a stair:
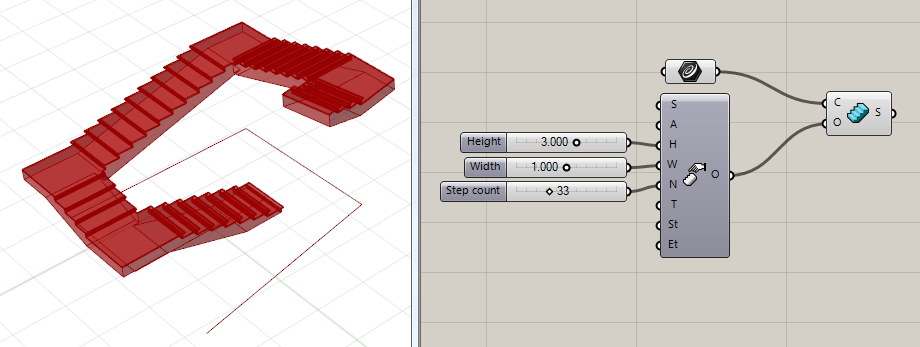
- 1. Drag a VisualARQ “Stair” component
 onto the Grasshopper canvas. This stair component has two inputs:
- C: Stair path.
- O: Options to specify all stair parameters.
- 2. Assign a curve to the stair C input. That curve will define the stair path. You can pick one or multiple curves as long as they are Lines, Polylines or Arcs, and one stair object will be generated for each curve selected. Stairs from polylines will create a stair flight for each segment of the polyline.
The chosen curve(s) can be taken from Rhino (referenced in Grasshopper with the Curve Param) or created directly in Grasshopper.
Remember that the curve(s) must be planar and open, otherwise the stair(s) won’t be generated.
(Note 1: You can’t edit each stair flight type (“steps” or “landings”) from Grasshopper. You need to bake the stair and do it from the stair object properties dialog box ![]() .)
.)
(Note 2: VisualARQ stairs in Grasshopper can’t be created from curve types other than lines, polylines or arcs, as this is the way it works in Rhino too. In future versions of VisualARQ, stairs will be able to be created from any curve type.)
2. Define the stair parameters:
- 1. Drag a Stair Options component
 onto the Grasshopper canvas. This component has different inputs which define the stair parameters.
 - 2. Plug the Stair Options O output into the Stair component O input.
- 3. Set the different Stair Options:
- (S) Stair Style:
 You can drag a Stair Style Param component onto the canvas, plug it into the S input of the Stair Options. This Stair Style component has a standard stair style assigned by default. To assign a different stair style, right click on this component and select the “Set one Stair Style” option from the list. Grasshopper will be hidden until you select a stair style from the list displayed in the new pop-up dialog. This list shows the existing stair styles available in the Rhino document you are working on. If you want to create new stair styles, you can do it from the VisualARQ stair styles dialog in Rhino (_vaStairStyles command) or directly in Grasshopper, explained below in point 3 of this tutorial.
 - (A) Stair Alignment:
 The Stair Alignment defines the position of the stair based on the direction of its base curve. Drag and plug a Stair Alignment component (located inside the Input section, under the Params tab in Grasshopper) and do right click on it to select one of the three options: left, center or right. These alignment positions can be also entered as integer numbers (0=left, 1=center and 2=right) in the A input.
 - (H) Stair Height: The stair height is the total height of the stair object. Drag a Number Slider component onto the canvas and plug it into the H input of the Stair Options. When the Stair Options have no number plugged into its H input, or this value is 0, the stair takes a height value by default.
- (W) Stair Width. The stair width value is regular along the stair path.
- (N) Step Count: Total number of stair steps.
- (T) Tread: Tread step dimension.
- (St) Start thickness: This value defines the thickness of the stair slab at the bottom (start) of the stair. It is meant to match the stair slab with a slab located at the stair start. This value only affects stairs whose style has a slab.
- (Et) End thickness: This value defines the thickness of the stair slab at the top (ending) of the stair. It is meant to match the stair slab with the slab located at the stair end. This value only affects stairs whose style has a slab.
- (S) Stair Style:
3. Create a new stair style:
- 1. Drag a Stair Style component
 onto the Grasshopper canvas. This component has different inputs which define the stair style parameters.
- (N) Name: Name of the stair style.
- (C) Stair Components: Stairs can or cannot have components. The only component available for stairs is the Stair Slab . Drag a stair slab component
 and plug it into C. Give a name (input N) and a thickness (input T) to the stair slab component.
4. Create a spiral stair
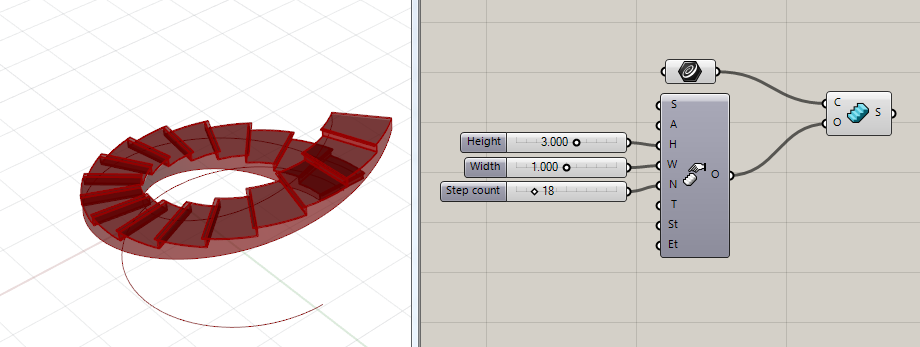
The process of creating a spiral stair is the same as creating a normal stair. The only difference is that you need to pick an Arc as the spiral stair path.
(Note: Spiral stairs can’t be created from a path that makes a turn bigger than 360º. So just take that into account when you set the number of steps, or the step tread dimension, because these values may make the stair turn more than 360º and it won’t be generated.)
5. Flip the stair direction
The stair direction is determined by its path curve direction. If you need to change the stair direction, just flip the path curve, using a Flip Curve component ![]() (Curve tab > Util).
(Curve tab > Util).